How-To: Shore Shots
A goof-proof guide to capturing six classical coastal scenes.
By Ian Frazier ท Photos by Ian Frazier July 2006
From the mocking cries of seagulls to the tranquil repetition of waves lapping the land, the coast is beautiful on many levels. But capturing its many facets photographically can be a challenge. After years of photographing on the shore, I’ve learned a lot of lessons—many the hard way. Here are some of my favorite shots, along with tips to help you in similar situations.
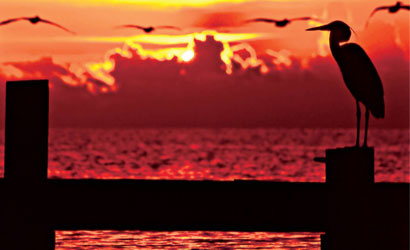
1. Silhouettes at Sunrise A sunrise shot means being on location half an hour before the big moment. Get your equipment set up while you’re still in the dark, because the magic light lasts only a few precious minutes. The same goes for sunset.
To get this shot of an egret in Long Key State Park in the Florida Keys, I scouted the area the day before and found out when and where the sun would be coming up. This is especially important if you want silhouettes with the sun behind your subject.
Use a tripod. Even when shooting into the rising sun, you might need a wide aperture and slow shutter speed.
As for determining exposure, I used the camera’s spotmeter on the darker part of the clouds. Evaluative metering would also have worked here, but only because the dark foreground is just a small part of the photo.
I used a Minolta Maxxum 7 and 100–300mm lens with a UV filter. Exposure was 1/500 sec at f/6.7, using Fujichrome Provia 100 slide film.
2. Get the Drift Coastal photos aren’t all sweeping skies and expansive beaches. There are great subjects in everything from seashells to driftwood. For a shot like this, wait until late in the day, so that the warm evening light emphasizes the fiery form of the wood. Set your tripod low, and carefully compose to capture both the tree and beach, while checking the viewfinder for distracting elements. In this case, I noticed a set of dog footprints and quickly covered them with a sprinkling of sand.
To ensure that the driftwood has a light and glowing quality, spotmeter off of the main part, and open up one stop. The highlights will hold their detail, while creating a lighter feel to the picture. For lots of detail and little grain, I stuck with slow slide film, Fujichrome Provia 100.
3. You Must Graduate For dramatic skies, it’s tough to beat the shore. To capture them, nothing beats graduated neutral-density filters.
First, take spotmeter readings off both the sky and the foreground. Here, the sky was three stops brighter than the sand. To avoid blowing out the detail in the sky by exposing for the sand, I used a soft-edge two-stop neutral-density filter (P-size from Cokin).
The filter darkened the sky and lowered the exposure range in the image. A stop or two difference between the foreground and sky is fine.
While there are sophisticated mounting systems for an ND filter, you can simply hold it in front of the lens, or use gaffer’s tape to keep it there. Left your filters at home? If you’re shooting digital, take several shots, bracketing the exposures, and combine them later with software
posted by photo-lover @ 3:51 AM
![]()
![]()


0 Comments:
Post a Comment
<< Home